Connect your site to Labrika
With all of our Labrika subscriptions, you can create exportable white-label reports that are easily accessible for your clients to download directly from your site. These reports can be customized with your own logo and menu structure, ensuring they align perfectly with your company’s branding. Each report is categorized, allowing you to share specific analytics, such as keyword rankings, with your audience.
Different Ways of Sharing Labrika Reports
Share Labrika Report Link
You can share a link to the report, enabling recipients to access it using this specific link without requiring a login. To do this, select the “link” option (which is selected by default) after clicking the ‘get a link to the report’ icon located in the sidebar at the top right corner (the share icon with three dots and two lines).
Simply copy the link displayed under ‘report link’.
Self-Hosted Report on Your Website
Alternatively, you can download a copy of the report and host it directly on your website for your clients to access. This method is preferred by those seeking a truly white-label report for clients and colleagues.
How to Create and Use a Self-Hosted Labrika Report on Your Website
-
Click the “file” option after selecting the ‘get a link to the report’ icon in the sidebar (the share icon).
-
You will now see a page titled ‘Connect your site to Labrika’. Your page should resemble the following:
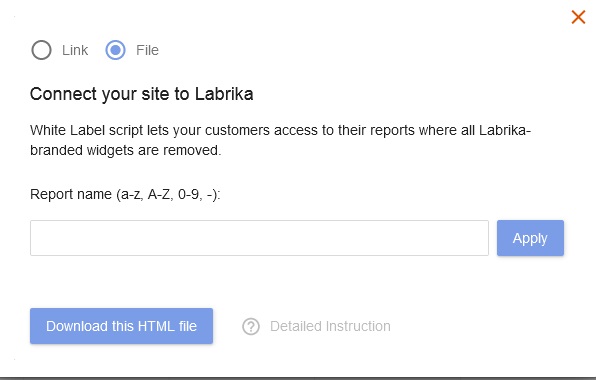
-
Under ‘report name’, type the desired name for your report and click ‘apply’. For instance, if you entered ‘wikipedia-ranking’ and clicked ‘apply’, your page will look like this:
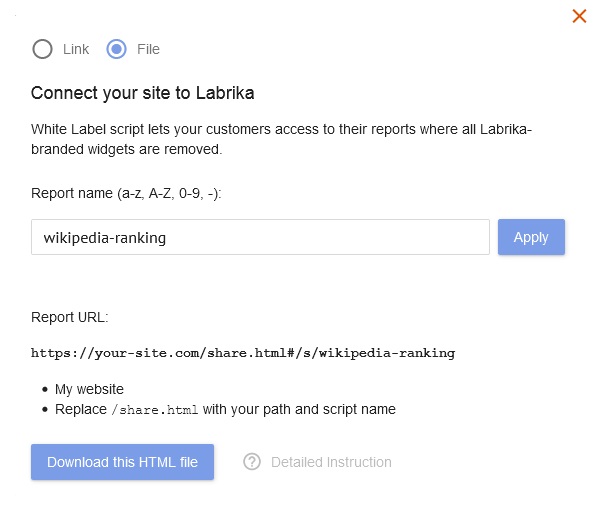
-
Click ‘Download this HTML file’ and upload it to your website's public_html directory (you may choose a different directory, but ensure the link provided to the user reflects this change) using FTP or cPanel/Plesk file manager.
-
Share the link with your clients to access their report through your self-hosted Labrika report.
If you uploaded the downloaded file shown in the screenshot (in step 3) to your public_html directory, the download link for your self-hosted report would be: https://your-site.com/share.html#/s/wikipedia-ranking
Please note: You should create a unique report name for each report you upload to your site. Otherwise, you will need to use separate files or directories for each report, as they would otherwise share the same filename.
For example:
‘share.html’ is the filename in the link: https://your-site.com/share.html#/s/wikipedia-ranking
Consider changing the name to something like ‘share1.html’ or ‘report1.html’.
The second report you upload could then be named ‘share2.html’ or ‘report2.html’, allowing you to use the same directory for all your reports.
Create Your Own Custom Menu for Multiple Reports per Client
You can create a custom menu for your clients, allowing them to easily switch between reports without needing to open new tabs each time. Simply paste your code with multiple links to different reports in the designated sections below to display multiple reports per page.
<template id="app-header">
  <!-- Paste header code here -->
</template>
<template id="app-footer">
  <!-- Paste footer code here -->
</template>
How to Rename and/or Move Self-Hosted Report Files for More Personalized Link URLs
After downloading the report from Labrika and uploading it to the public_html on your site without changing any names or file locations, the link would be: https://yoursite.com/share.html#/s/wikipedia.com
In this case, ‘share.html’ is the filename, and wikipedia.com is your parameter name. To change the file name or link URL, you can adjust the folder where you uploaded the file and/or rename the ‘share.html’ file.
For example, if you moved the ‘share.html’ file from the public_html folder to a ‘private’ folder and renamed it to ‘position.html’, the new URL for clients to access would be: https://yoursite.com/private/position.html#/s/wikipedia.com
Restricting Outside Access to the Report
To maintain the confidentiality of your reports, there are several methods to restrict access:
-
Control access using HTTP Basic authentication.
-
Add additional characters to the report name to prevent outsiders from guessing the link.
Examples include:
Changing the parameter name to: https://yoursite.com/private/position.htm#/s/wikipedia.com-psw-64sf1FG11
Using a generated code without identifiable names: https://yoursite.com/private/position.htm#/s/64sf1FG11
Or creating a completely separate filename for each client: https://yoursite.com/customer/wikipedia#/s/position
Best Practices for Report Automation and Sharing
To enhance your reporting process, consider the following best practices:
- Utilize automated reporting tools to streamline the generation of reports, saving valuable time and effort.
- Incorporate data visualization tools to present your analytics in a clear and engaging manner.
- Ensure that your reports are shareable and easily accessible, allowing for collaborative reporting among team members.
- Regularly update your reports to reflect the most accurate data and insights.
- Maintain a centralized location for all reports to simplify access for stakeholders.