
 English
expand_more
 Español
 Deutsch
 Français
 Português
 Türkçe
 Polski
 العربية
 हिन्दी

How to check landing pages before a campaign and monitor them after launch
Before launching ads, check the whole conversion path: the ad reaches the right page, the offer is current, the form works and the enquiry reaches your team. Labrika finds technical errors, saves landing page screenshots and monitors changes throughout the campaign.
Start with the ads' final URLs
Export or copy the landing page addresses from the campaign: service ads, categories, product pages, promotions and sitelinks. A working homepage is not enough to approve a rental campaign; check the actual URL containing the rental terms.
Add the website to Labrika and run a full audit. To check only selected sections, enter “URL restrictions” in “Crawler Settings”: /office-coffee/ and /service/, one per line. To include pages within those folders, leave “Skip all other pages” off. Enabling it limits the check to the exact listed addresses.
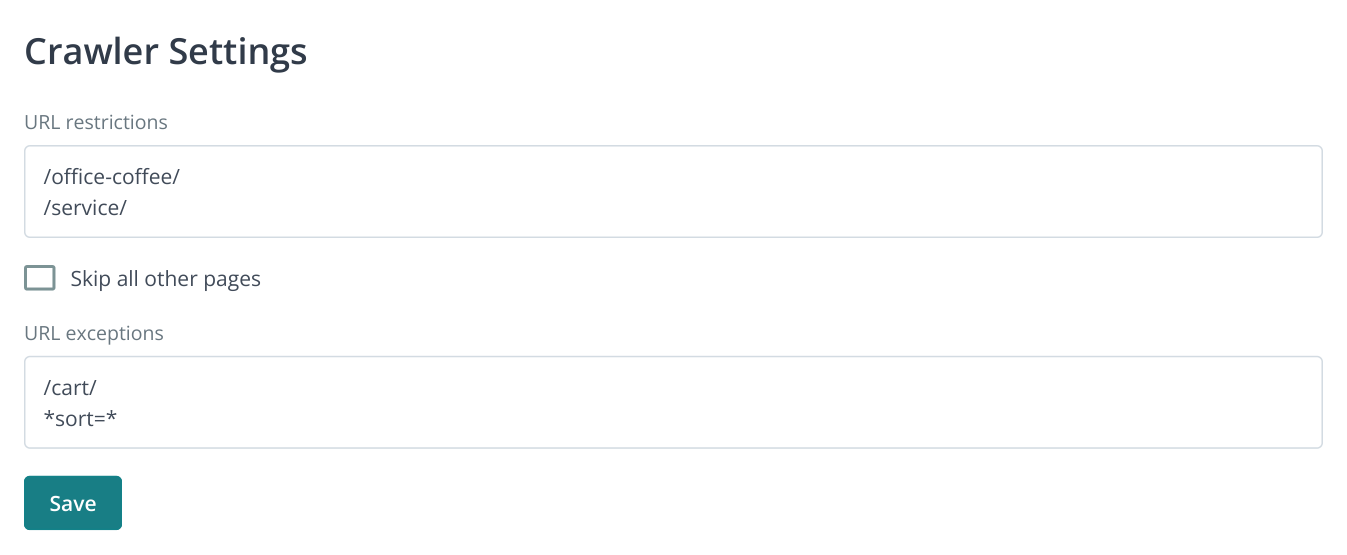
1. Leave “Skip all other pages” off to crawl folders and their child pages. Turning it on restricts the crawl to the exact addresses in the list.
Use “URL exceptions” to exclude the cart and unnecessary sorting variations. After analysis, find every campaign URL in the results; add any missing addresses to the crawl scope. For a React or Vue landing page, enable JavaScript processing using the JavaScript website guide.
Send blocking errors to the developer
In “Technical audit”, open “4xx errors”, “5xx errors”, “Multiple (chained) redirects” and “Pages with broken links”. Select campaign URLs and destinations linked from landing page buttons and links.
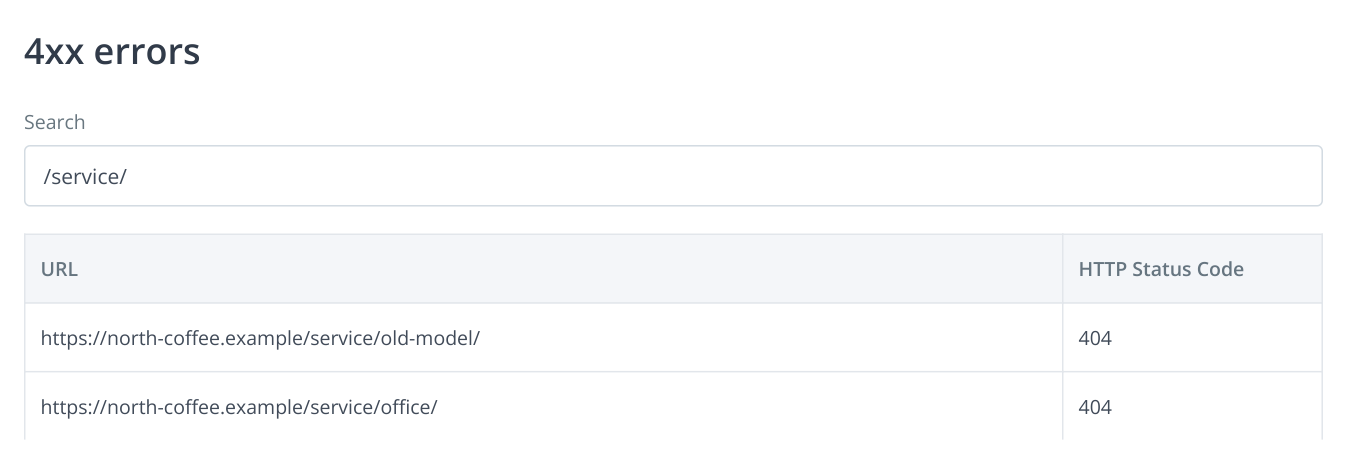
2. Example report: compare the listed addresses with your ads' final URLs. Two campaign URLs need fixing before launch.
| Finding | Effect on the campaign | Task to assign |
|---|---|---|
| The landing page returns 404 or 500 | A paid click does not reach a working offer. | Restore the URL or replace the ad's final URL, then check again. |
| A redirect leads to the homepage instead of the product | The visitor loses the selected model or promotional terms. | Send the ad to the relevant page and verify its final URL. |
| A payment, delivery or terms link is broken | The visitor cannot complete their decision or read the ordering terms. | Open the pages containing the link and fix it in the block or template. |
| Content depends on JavaScript | A check without script execution misses part of the page. | Repeat the analysis with JavaScript and check that text, forms and links appear. |
Include the exact URL, finding and expected outcome in the task. “Restore /service/office/, then test the form” is more useful than “fix the website”. For repeated errors, send the whole list to the developer; the cause is often a shared template.
Match the landing page to the ad's promise
After the technical check, open the pages as a visitor. For a product ad, compare the model, configuration, price and stock status. For a service, check the city, scope, price or pricing method. For a promotion, check the dates and terms. This catches functioning pages whose offers are outdated.
For example, a banner promises maintenance included in rental, but the landing page still has an old version without that term. Visitors may leave even though the page returns 200. Monitor the relevant offer text so a later release cannot remove it unnoticed.
Monitor the form, offer and availability
Create a separate monitoring project and select “Paid search advertising monitoring”. In an existing project, change the mode through “Change project type” → “Paid search advertising monitoring” → “Save type”. Add the ads' final URLs in “Tracked pages”.
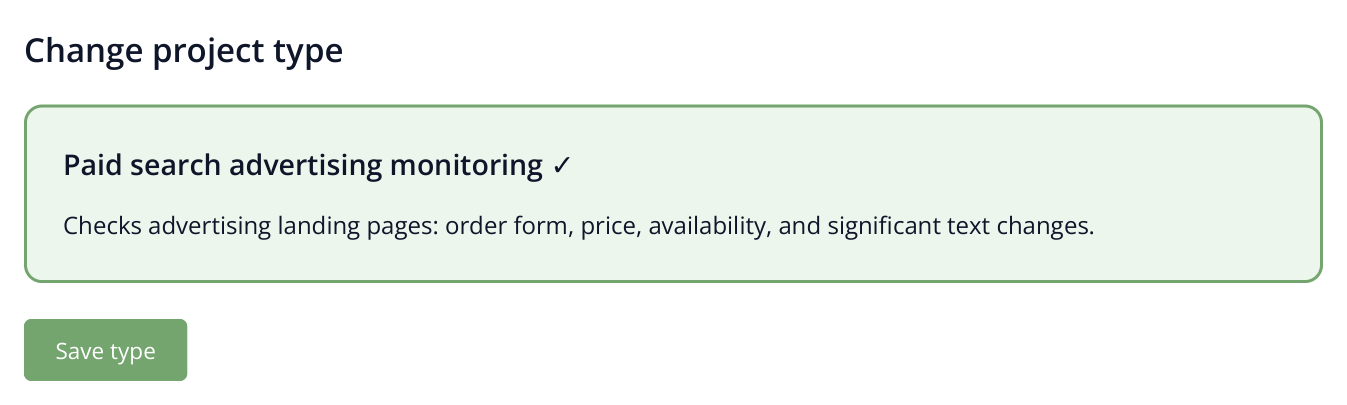
3. The project type determines the specialized report in the menu. Choose “Paid search advertising monitoring” for paid search landing pages.
In “Analysis and alert rules”, set the expected status to 200. Under “Advanced settings” → “Text or HTML fragments that should not disappear”, add a stable form fragment, such as id="lead-form". Use the value from your own page; create separate rules for different form structures.
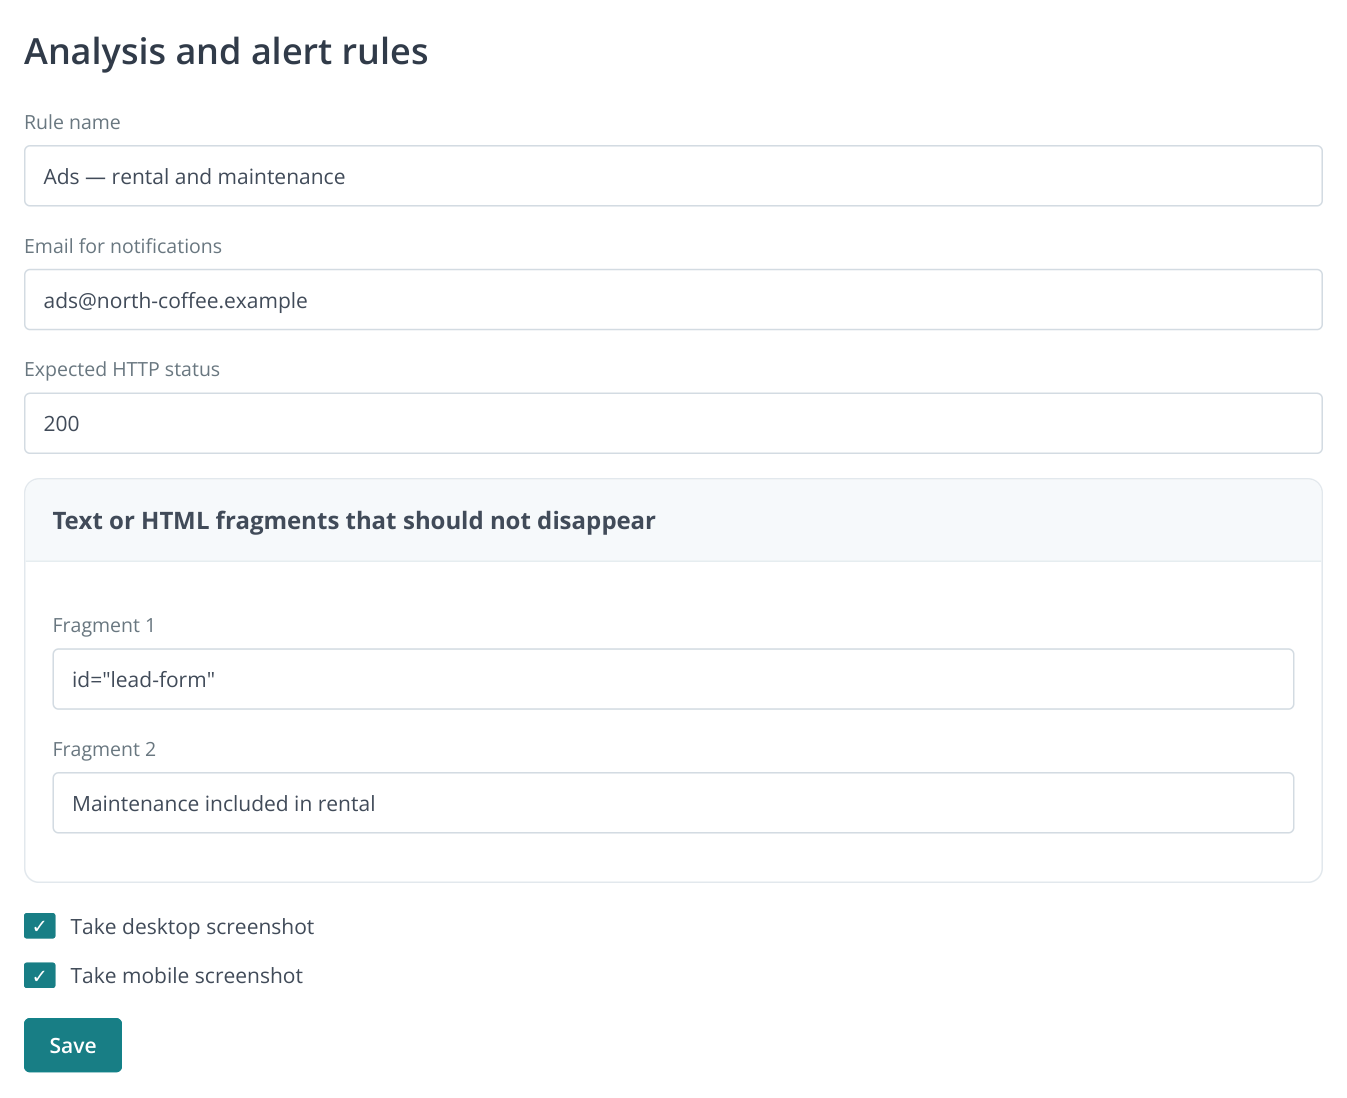
4. Part of the rule: it checks availability, the form and an important offer term, and saves screenshots. Use the form ID and wording from your own page.
For a store, add price and availability using the price monitoring guide. For a promotion, add a phrase that must remain on the page. Select the addresses in “Tracked pages”, click “Set rules” and assign the rule. The first run will show whether it finds the intended elements.
Check the mobile layout and save a baseline
Enable “Take desktop screenshot” and “Take mobile screenshot” in the rule. For dynamic pages, enable JavaScript and set a screenshot delay. In the first analysis, check that the price, offer and enquiry button are visible and not covered by a pop-up.
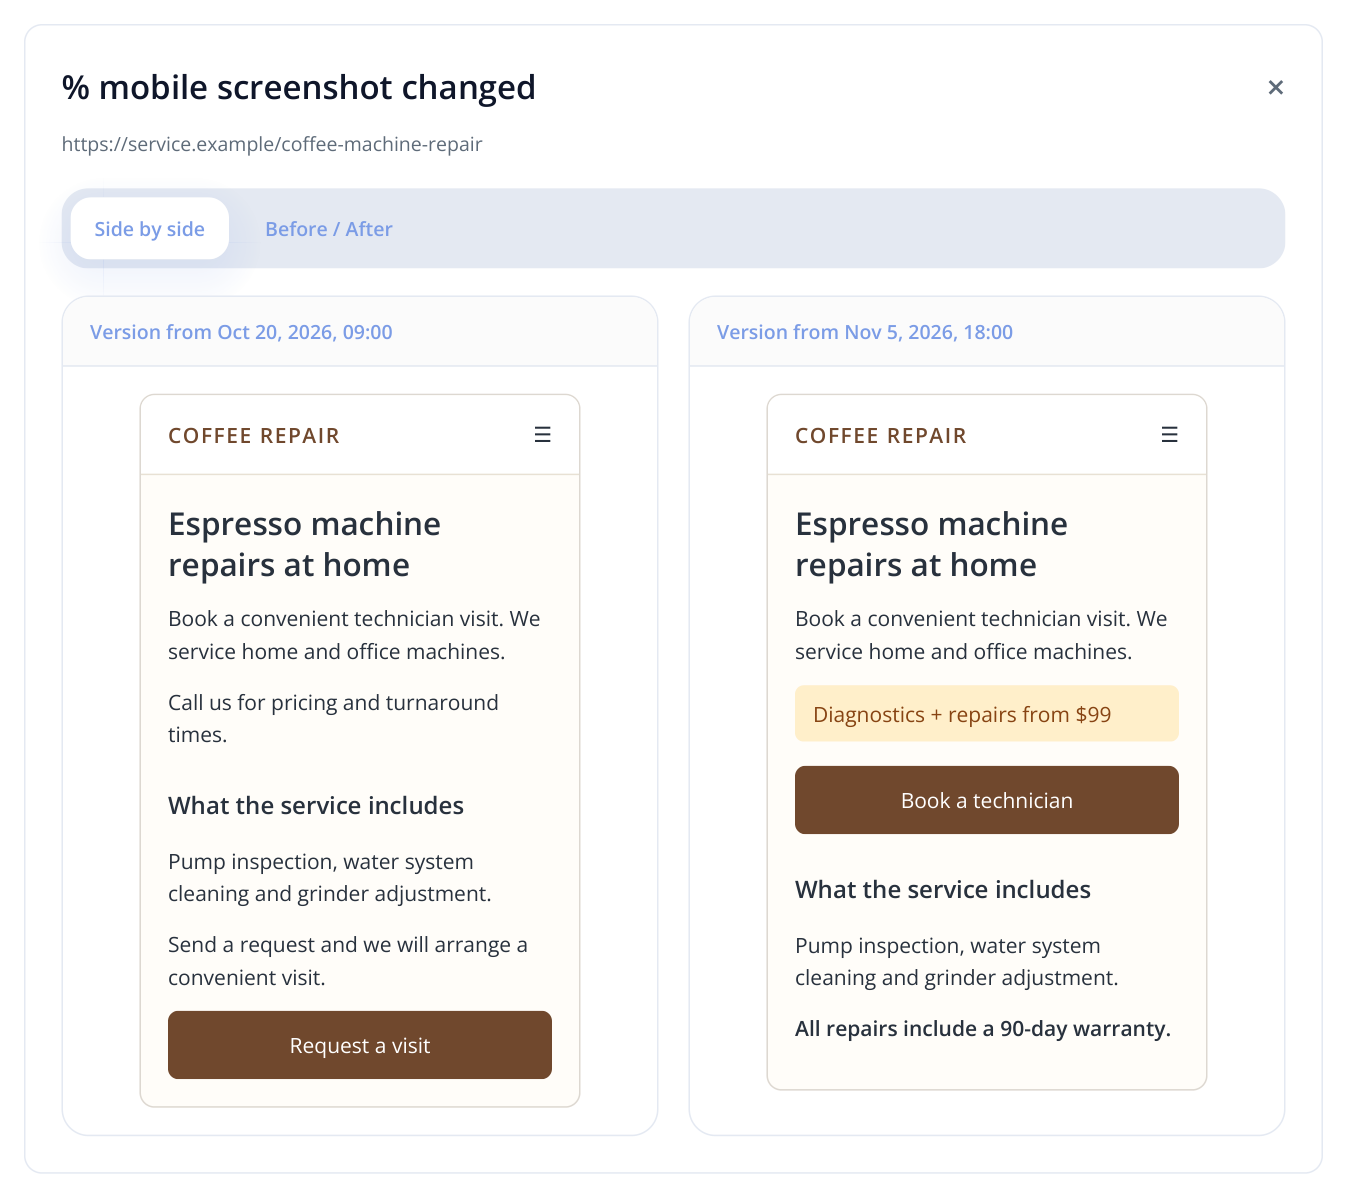
5. Example mobile page sign-off: the contractor moved the price and enquiry button higher and added a warranty. The screenshots show the published changes on two dates.
A screenshot is especially useful before a sale, after a template change or when launching a mobile campaign. Compare it with the new version after release using “Side by side” or “Before / After”. If a banner covers the button, attach the comparison to the developer's task.
Keep monitoring throughout the campaign
Set “Email for notifications” in the rule and choose checking times in the schedule. Stores can check landing pages after price and stock updates; service businesses can check after regular publications or releases. Run a baseline analysis before sending traffic, then confirm the first scheduled run completes.
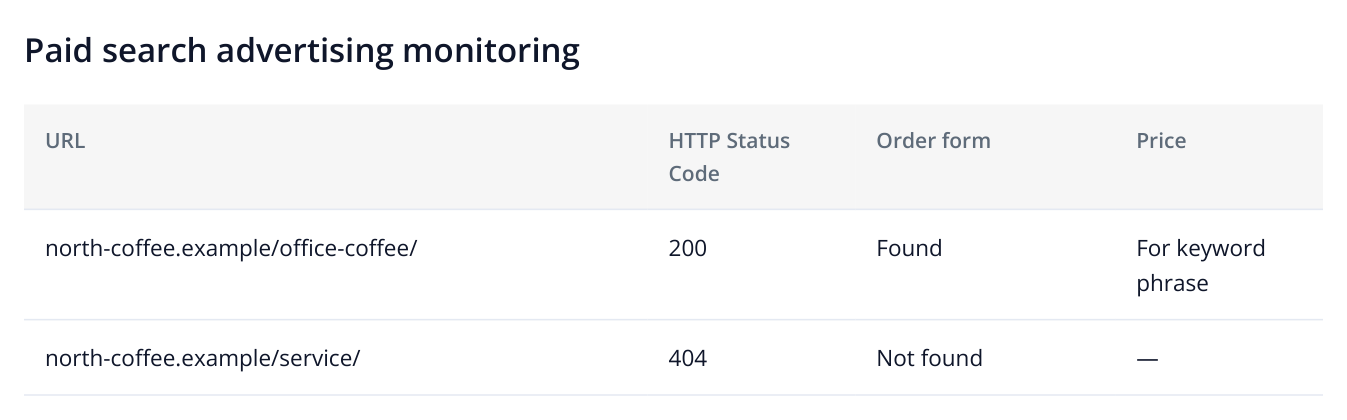
6. Illustrative example: restore the second landing page before sending paid traffic to it.
Find problematic rows in “Paid search advertising monitoring”. If a landing page becomes unavailable, the PPC owner can review the campaign while the developer receives the URL and saved result. If an offer disappears or a product goes out of stock, the marketer can decide whether to change the landing page, update the ad or temporarily pause traffic to that product.
Agree on who reads alerts and who can change the campaign. An error email is useful when someone owns the response. For several clients, use a separate email address or a clear rule name.
Test lead delivery and document launch readiness
Before launch, submit a test enquiry from a phone and a desktop. Check required fields, the success message, delivery to the CRM or inbox, and the conversion event in your analytics. Labrika records form presence and appearance; a test submission verifies the entire enquiry path.
Attach final URLs, resolved problems, the last check date and the test enquiry result to the launch task. An agency can show the client what was prepared, and an in-house marketer can return to the baseline after a website update.
After launch, use monitoring alongside campaign data. If enquiries decline, first check whether the page changed during the same period. Text, meta tag and screenshot history help investigate a release-related cause; spending and conversions show its business impact.